Tuesday, 9 August 2011

Young Miniatures - Fallschirmjäger, FJR 9, Ardennes, 1944

.
After three months of intermittent painting, I'm so glad to finally lay the finishing brush strokes to this recreational project. Unfortunately the lack of available time due to family commitments prevented me from documenting further sequences to the painting process prior to the finish. That's all the update for now. Hopefully I'll be able to get my gear back into sculpting the next time round.


Cheers,

Calvin


Sunday, 5 June 2011

Young Miniatures - Fallschirmjäger, FJR 9, Ardennes, 1944

.
I've decided to once again indulge myself with a recreational project compliments from Young Bok, proprietor and principal sculptor of Young Miniatures. Consisting of only five parts, clean-up and assembly took under an hour before it was christen with a veil of grey primer.


Continuing from the previous project of the MG-34 machine gunner bust, I interfaced each connecting part with magnets for easy handling during painting. This was achieved by drilling out a shallow cavity to accommodate the piece of magnet. Epoxy putty was used to both adhere and maneuver the magnet into alignment with its corresponding half. I got to admit that this eventually proved quite fun when I toyed with the parts as they "clicked" together.


Moving on to the painting, I employed a traditional approach used in classical painting known as painting on colored grounds.

"A toned ground can be used to create atmosphere or mood, to unify a composition, indicate lighting conditions, or to give sculptural form to an object by giving depth to shadows. A toned ground speeds the process of painting, allowing simpler modelling and killing the stark white that otherwise would confront the artist initially." Colour and Tone in Whistler's 'Nocturnes' and 'Harmonies' 1871-72" by Stephen Hackney. The Burlington Magazine Vol 136, No 1099 (Oct 1994), pp695-694.

As such red,blue,violet and orange were initially sprayed over a black undercoat before assigning the local colors.


I also tried to experiment with a "Wet on Wet" diffusion technique, similar to that used in watercolor painting. As this required a homogeneously damp surface in order for the different colors to mingle, water was sprayed over the surface with an airbrush before dabbing on the colors immediately after.


Complimentary colors for the face were subsequently introduced for added tonal variety and contrast.


The various stages to painting the face; from the blocking of tonal colors to the gradual refinements. As I do not have a linear work flow, this area will still be subjected to additions and changes as with the progress of the project.


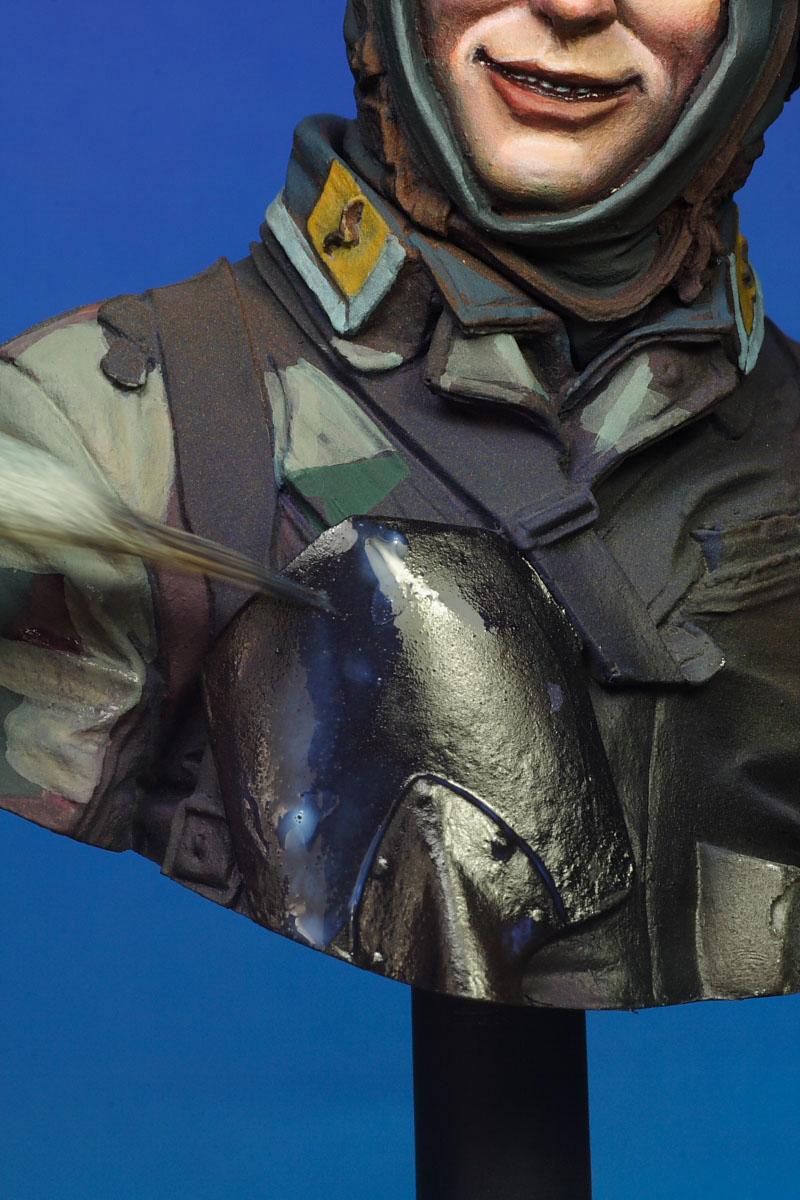
The shovel was undercoated with gloss varnish before dry-brushing with silver enamel paint.


It was then painted over with an opaque coat of dark blue and allowed to dry.


A light mist of water from the airbrush provided the moist surface which allowed the dabs of orange to be randomly diffused across the shovel blade.


Effects of wear are simulated by carefully chafing the paint with a hard metal tool.


Progressive painting for the camouflage jump suit and accompanying accessories.


That's the work for now until opportunities at home allows.

Calvin


Monday, 16 May 2011

Young Miniatures - Obergefreiter, Operation Barbarrossa, 1941


I just though I'll take a short break from sculpting (and everything else) to wet my brushes in the palette with this box art assignment from Young Miniatures. Sculpted by Ebroin, this extensively designed bust provided me the needed opportunity to further my studies into the impressionist concepts of color usage.


With the exception of attaching the right wrist and MG sling to the MG-34,
the assembly for this kit was rather straightforward. I resolved the alignment issues during the test fitting phase by interfacing connecting parts with magnets before committing the super glue.


This process also made handling of sub assemblies much convenient as they could easily be attached to a "helping hand" during the various processes of painting.


There was no significant departure to my usual process of airbrushing on the local colors over a dark undercoat(in this case dark violet). My palette consisted of limited colors; mainly consisting of primaries and secondaries. Most of the shades and tones of the field grey tunic were mixed from magenta, orange, pastel blue and park green. Glazes of violet and blue were used in lieu of black for the shadows, with an occasional dash of orange to create the impression of brown dirt. The key reason of rejecting stock-mixed colors was to also create more reiterations of a singe tone as a result of inconsistent mixing of their parent colors. This inadvertently allows more subtle tonal variations to occur whereby no single tone will be exactly the same throughout.


Special attention however was devoted to the effects of bounced light onto lighter colored surfaces for greater atmospheric effect.


This concludes my recreational assignment from Young Miniatures and hopefully the next update will be on the long protracted sculpt for Alpine Miniatures.

Calvin


Tuesday, 4 January 2011

1/16 US Marine Recon, 1970

.


A happy belated new year to all and what better way to usher the new year with a 1/16 scale sculpt based on the head study. There are obvious plans for a commercial release of this sculpt by Alpine Miniatures but not anytime soon due to other personal and work commitments.

With the exception of the hands and boots (done in epoxy putty), the entire figure is sculpted from a 50/50 compound of Super Sculpey and Super Sculpey Firm. There's still a long way to go before it finds its way into the rubber mold. Many details such as the canteens, grenades, K-Bar fighting knife and the tropical rucksack will needs to be fabricated and features such as the hands will need additional attention.

As mentioned, it's still a work in progress and do feel free to furnish whatever opinions of the sculpt.

cheers,

Calvin


Monday, 16 August 2010

A New Head Sculpt

.


Here's a quick 1/16 scale head study realized in a compound of Super Sculpey and Super Sculpey Firm on a resin mannequin spare. A needle inserted through the ears helps gauge the symmetry as I sculpt. It's still a work-in-progress as I usually use such photos taken of the sculpt to identify mistakes and blemishes. The dots for the iris are placeholders and will be worked over before curing under a 60W lamp.
I've no idea what final form this will assume but I'm probably guessing an M-16 will be implicated ;)

Calvin